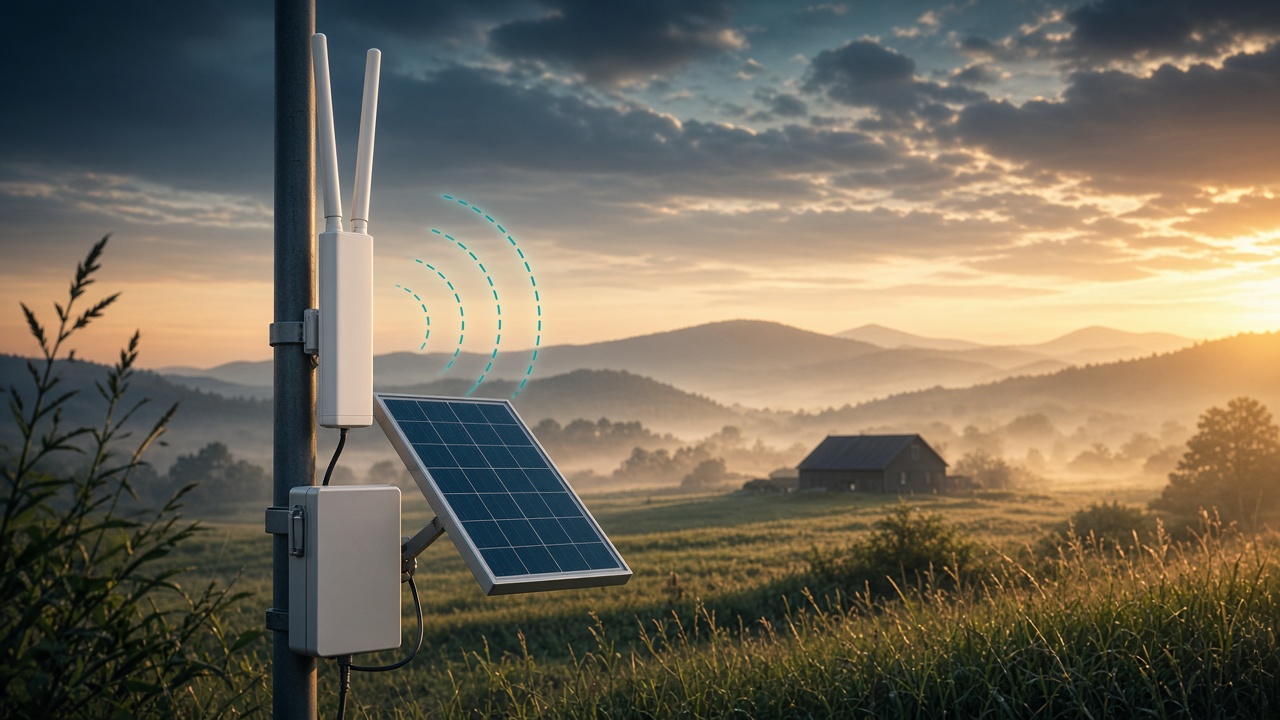
Sometimes the Wi-Fi you need is where the power and the cable aren't: a barn, a dock, a campsite, a job site, the far end of a field. Ubiquiti doesn't sell a solar-powered UniFi access point, but a standard UniFi AP draws about 10 watts, which is well within what a modest solar setup can supply. This post is an overview of how to build one yourself.
This overview was inspired by a discussion on r/Ubiquiti. Community builds like that are a good reminder that the hard parts are sizing and the converter, not the AP itself.
The idea in one paragraph
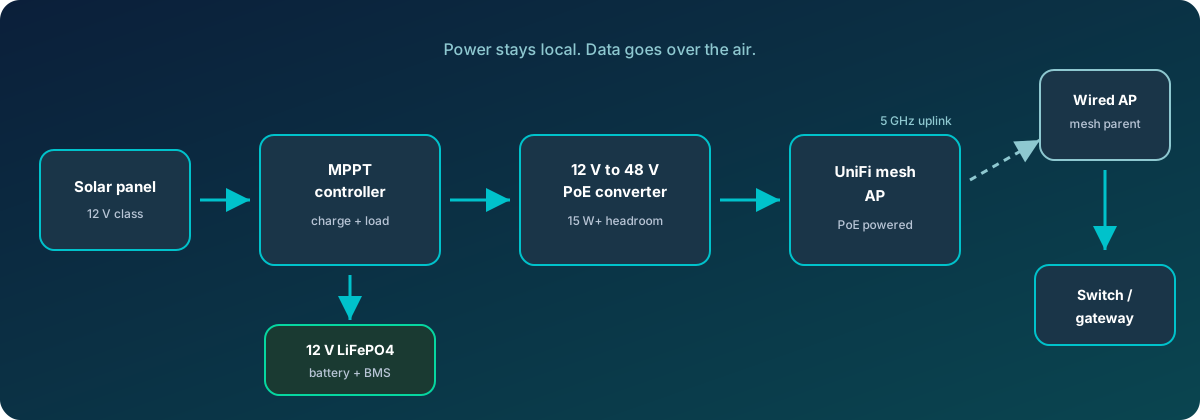
Solar panel feeds a charge controller. The controller charges a battery. The battery feeds a DC-to-PoE converter that steps 12 V up to the 48 V PoE the AP expects. The AP joins your existing UniFi network over a wireless uplink to a wired UniFi AP, so no Ethernet run is needed. Power stays local, data goes over the air.
Pick the right access point
Not every UniFi AP is a good fit. You want something designed for outdoor or mesh duty, with a low power draw.
| Model | Power input | Max draw | Rated range (stock antennas) | Notes |
|---|---|---|---|---|
| U6 Mesh | 802.3af PoE, 44 to 57 V DC | 11.4 W | Not published as linear range | Wi-Fi 6, 4x4 on 5 GHz, 2x2 on 2.4 GHz; Ubiquiti lists 140 m² (1,500 ft²) coverage area instead |
| UAP-AC-M (AC Mesh) | 24 V passive PoE or 802.3af Alt. A, 44 to 57 V | 8.5 W | Up to 183 m (600 ft) | Older Wi-Fi 5, indoor/outdoor, lowest draw |
| UAP-AC-M-PRO | 802.3af PoE | 9 W | Up to 183 m (600 ft) | Outdoor Wi-Fi 5, 3x3 MIMO, 8 dBi internals |
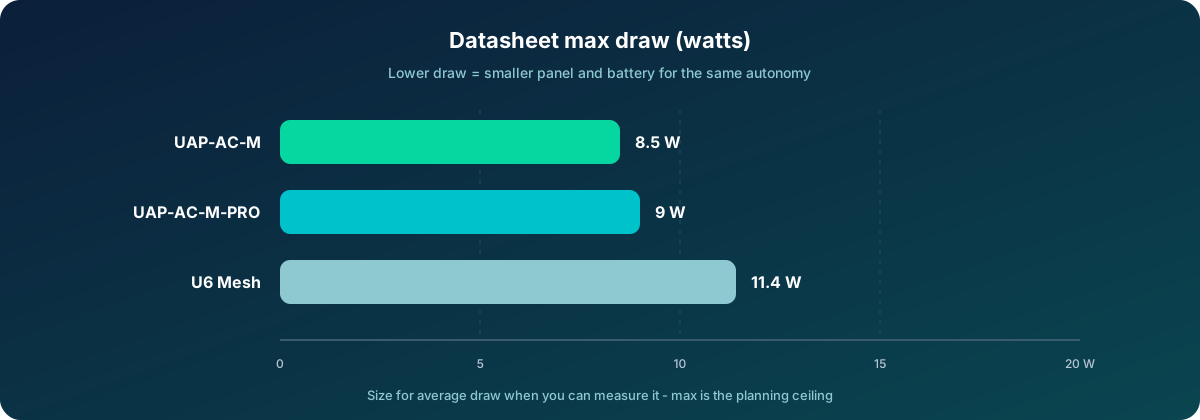
Ubiquiti publishes those linear range numbers for optimal environments with the stock antennas, and they do not break the figure out by band. The AC Mesh and AC Mesh Pro Quick Start Guides both list 183 m (600 ft). The U6 Mesh has no matching linear figure — Ubiquiti only publishes a coverage area (140 m² / 1,500 ft²), so that row stays blank of meters rather than mixing units in the table.
Real outdoor client coverage is shorter. Installer and community reports for phones and similar clients in open space commonly land around:
- UAP-AC-M: roughly 30 to 45 m (100 to 150 ft) of usable coverage; some outdoor tests see signal near −70 dBm by about 40 m
- UAP-AC-M-PRO: roughly 45 to 75 m (150 to 250 ft) of usable coverage; about 40 to 50 m (130 to 160 ft) is a common target for reliable phone use
- U6 Mesh: often discussed in the tens of meters outdoors; clear line of sight toward 100 m is a stretch, not a plan
Those are field reports, not datasheet guarantees. Trees, walls, interference, mounting height, and the client's weak transmit radio all shrink the usable bubble. The marketing 183 m figure is not a budget you should design to.
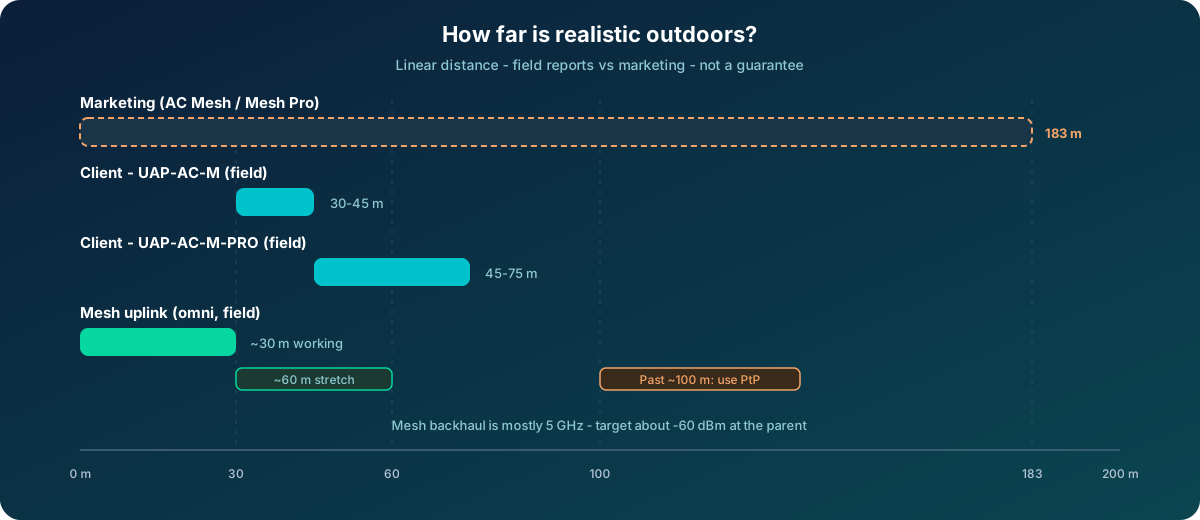
The U6 Mesh is the natural modern choice. If you are trying to squeeze every watt, the AC Mesh draws less. Check Ubiquiti's current spec sheet for the exact unit you buy, since power figures and PoE modes vary by model and revision.
AC Mesh antennas and sun
If you pick the UAP-AC-M, budget for the stock whip antennas. The AP body holds up outdoors; the plastic on the antennas often does not. After a few years of direct sun — especially hard UV climates — they yellow, go brittle, and can crumble in your hands while the radio still works. Ubiquiti does not sell spare stock whips.
What people actually do:
- Third-party dual-band RP-SMA omnis. The connectors are RP-SMA. Buy a pair of outdoor dual-band (2.4 / 5 GHz) sticks and keep the gain near stock — about 3 to 5 dBi. Higher advertised gains on cheap antennas are often marketing. Mount them in the usual V pattern.
- Ubiquiti UMA-D. The official directional option: UV-stabilized enclosure, about 10 dBi on 2.4 GHz and 15 dBi on 5 GHz, with a narrower beam. Use it when you want a aimed sector (for example toward a parent AP or a coverage patch), not full omni around the pole.
- Protect them early. White heat shrink on the lower few centimeters, UV-resistant clear coat, or a rubberized tool dip on the antennas and connector boots all show up in field reports. Shade helps when the mount allows it.
The AC Mesh Pro and U6 Mesh use internal antennas, so this particular failure mode does not apply the same way — though full-sun UV still ages outdoor plastics in general.
Why power draw matters: every watt you draw all day and night is 24 watt-hours, and you have to harvest that from the sun on the worst day of the year.
Parts you need
You are shopping for categories, not specific brands. Here is what each part has to do.
- UniFi mesh-capable AP, as above.
- Solar panel (12 V nominal class). Size it for winter (see sizing below).
- MPPT charge controller matched to your battery chemistry, with a load output or a separate fuse block.
- 12 V LiFePO4 battery. It handles daily cycling well. Make sure it has a built-in BMS, and check its low-temperature charging limits. Charging lithium iron phosphate below freezing can damage cells, so in cold climates choose a battery with low-temperature charge protection or a heater.
- DC-to-PoE converter that takes battery voltage in and delivers the PoE mode your AP expects (24 V passive or 802.3af). This is the part to be careful with. See the next section.
- Weatherproof enclosure, cable glands, fuses, and proper gauge wire.
- Outdoor-rated shielded Ethernet for the short run from converter to AP, plus a surge protector if the run is more than a few feet.
- Pole or wall mount for the panel, ideally adjustable so you can tilt it for winter.
The converter: where most builds go wrong
Stay DC end to end. An inverter plus a wall-wart UniFi injector wastes battery for no gain. Match the converter to the AP's PoE mode and wattage — not "any 48 V injector."
| AP | PoE it expects | Max draw | Converter class that fits |
|---|---|---|---|
| UAP-AC-M | 24 V passive or 802.3af Alt. A | 8.5 W | 12 V → 24 V passive (~20 W), or 12 V → 48 V 802.3af |
| UAP-AC-M-PRO | 802.3af | 9 W | 12 V → 48 V 802.3af, ≥15 W |
| U6 Mesh | 802.3af (44–57 V) | 11.4 W | 12 V → 48 V 802.3af, ≥15 W (ideally 20–30 W) |
What people actually buy for solar / battery installs (Amazon preferred where the exact model is in stock). Prices below are approximate current Amazon list prices and change often:
- Tycon TP-DCDC Gigabit series — the usual Ubiquiti-community recommendation. Input about 9–36 V (fine on a 12 V LiFePO4 bank), Gigabit, dual DC inputs, short/overcurrent protection.
- TP-DCDC-1224G on Amazon (~$82) — ~20 W of 24 V passive PoE (natural fit for the AC Mesh)
- TP-DCDC-1248GD on Amazon (~$87) — ~17 W of 48 V 802.3af (fit for Mesh Pro and U6 Mesh)
- TP-DCDC-1248GD-M on Amazon (~$140) — same 802.3af output in a metal enclosure
- PoE Texas GAT-50V30W — 12–60 V DC in, ~50 V active 802.3af/at out, up to 30 W, Mode A pins. Better headroom for a U6 Mesh peak than the 10 W class. GAT-50V30W on Amazon (~$25).
- PoE Texas GPOE-48V10W — 10–30 V in to 48 V out, Gigabit, cheap and common in solar listings. Only about 10 W, and the output is passive (no handshake). Fine for light 802.3af loads; undersized for a U6 Mesh at 11.4 W max. GPOE-48V10W on Amazon (~$16).
- Outdoor IP67 DC-to-PoE boxes (for example IO-Power DPOE-PSP1248 class) — 12–28 V in with standard or passive 48 V out. Heavier and pricier; aimed at outdoor DC UPS / pole installs. Not consistently stocked on Amazon; see the IO-Power product page (quote required).
- Integrated solar kits (Tycon RemotePro and similar) — panel, battery, enclosure, and PoE out in one package. Convenient, but still do the winter math.
- Tycon RPS1224G-100-100 on Amazon (~$1,870) — 100 W panel, 100 Ah battery, 24 V passive PoE (better continuous-power rating than the tiny 30 W kits)
- Tycon RPPL2424 on Amazon (~$815) — smaller 30 W panel / 24 V passive PoE kit; often undersized for winter at many sites
- Wide-input industrial PoE switch — for example a TRENDnet TI-PG62B on Amazon (~$175 renewed; new listings often ~$250) with 12–56 V DC in and 802.3af/at out, or boost 12 V to 48 V into a small UniFi PoE switch. Makes sense if you will add cameras later; more idle draw for a single AP.
Two other system approaches still show up:
- 12 V battery → 48 V 802.3af injector for U6 Mesh / Mesh Pro (the usual path above).
- 12 V → 24 V passive for the AC Mesh, or a full 24 V battery bank that halves current in the DC wiring. Do not assume every 48 V "passive Mode B" brick will boot an AP that expects active 802.3af.
Things to check before you buy:
- Wattage headroom. Skip 10 W converters for U6 Mesh. Aim for 15 W minimum, 20–30 W if you can.
- Active 802.3af vs passive. Handshake matters for U6 Mesh and Mesh Pro. Passive 24 V is fine for AC Mesh when that is what you chose.
- Pinout (Mode A vs Mode B) and Gigabit passthrough — Fast-Ethernet-only injectors still exist.
- Input range. A 12 V LiFePO4 under load swings roughly 11–14.4 V. Prefer about 9–30 V (or wider) input.
- Efficiency. Budget roughly 10–15 percent converter loss in the solar math (Tycon lists about 75 percent minimum on some models — check the sheet you buy).
Also look for a converter with a built-in low-voltage cutoff, or add one on the charge-controller load output, so a deeply discharged battery is not driven further down. Fuse the battery feed. Bench test that the AP boots and stays up under load before you climb the pole.
What not to use here: stock Ubiquiti AC wall injectors, the Ubiquiti Instant Outdoor PoE Converter (that one is 48 V → 24 V, the wrong direction), and random Amazon "12→48 V" bricks that do not state Gigabit, PoE mode, pinout, and wattage.
Sizing the system
The method is simple. The hard part is being honest about winter.
- Daily load (Wh). Average AP draw in watts times 24. Use the real number from the UniFi controller or a meter if you can, not the datasheet maximum.
- Add converter loss. Divide by the converter efficiency.
- Winter peak sun hours. Peak sun hours are not daylight hours. A December day at northern latitudes can have a handful of daylight hours but only 1 to 2 peak sun hours. Size against the worst month you need to cover.
- Panel watts = daily Wh ÷ peak sun hours ÷ 0.85 (a planning allowance for field losses).
- Battery = daily Wh × days of autonomy ÷ usable depth of discharge ÷ battery voltage. Two days of autonomy is a common starting point, three if the site is remote.
Worked example
Assume an average draw of 10 W, converter efficiency of 85 percent, 2 winter peak sun hours, 2 days of autonomy, and 80 percent usable battery capacity on a 12.8 V LiFePO4:
- Daily load: 10 W × 24 h = 240 Wh
- With converter loss: 240 ÷ 0.85 ≈ 282 Wh/day
- Panel: 282 ÷ 2 ÷ 0.85 ≈ 166 W, so round up to a 200 W class panel
- Battery: 282 × 2 ÷ 0.8 ≈ 706 Wh, which is about 55 Ah at 12.8 V, so a 100 Ah battery gives comfortable margin
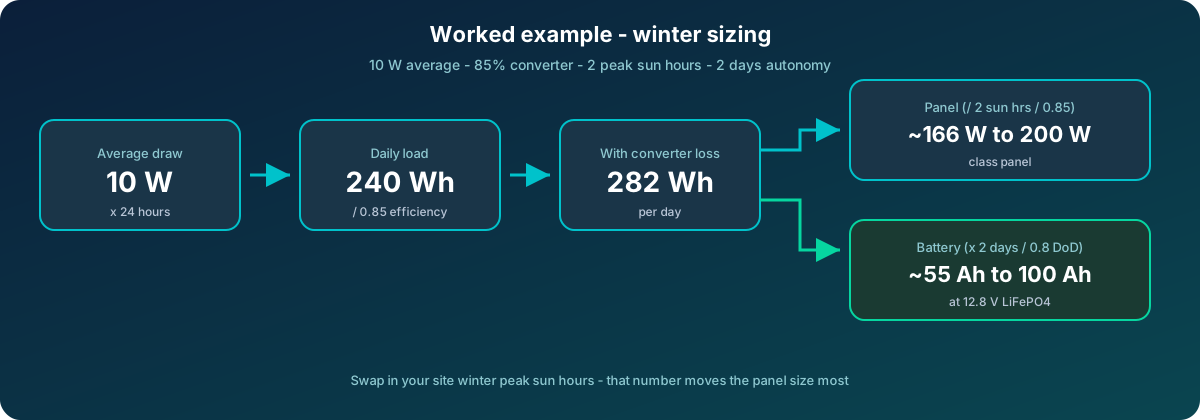
Swap in your own numbers. A sunnier site with 4 or 5 winter peak sun hours needs a much smaller panel. A site with heavy tree cover or snow on the panel needs a larger one.
Setting up the UniFi side
Power is half the project. The other half is making the AP join your network wirelessly.
Adopt it wired first. Wireless adoption is possible on some UniFi models, but the simplest and most reliable path is to adopt and update the AP on a bench with a PoE injector or switch, set it up in the controller, then take it out to the pole. Confirm firmware is current while it is still on the bench.
Enable wireless meshing. In the UniFi Network app, go to Settings, then WiFi, then Wireless Meshing, and turn it on. Then on the individual APs:
- On the wired AP that will be the uplink source, enable Mesh Parent.
- On the solar AP, enable Mesh Connect (wireless uplink).
- Do not enable Mesh Connect on APs that already have a wired uplink, since that creates routing complexity and can cause loops.
Menu names have shifted between UniFi Network versions. Older releases call this "Allow wireless downlink" and "Enable wireless meshing" under System settings. Check your version. Ubiquiti's current help article is a useful cross-check: Considerations for Optimal Wireless Mesh Networks.
How far can the mesh link go?
Ubiquiti does not publish a separate rated max distance for the mesh / wireless-uplink connection. The 183 m figures above are overall AP client-range marketing numbers, not mesh-backhaul ratings. Official guidance is about signal quality, not meters: aim for about −60 dBm or better between the solar AP and its mesh parent, keep wireless hops to a minimum (Ubiquiti recommends no more than two), and remember that mesh backhaul primarily uses the 5 GHz band.
In the field, omni-to-omni mesh links are planned much shorter than the marketing range:
- About 30 m (100 ft) is a common working distance for UAP-AC-M style uplinks with clear line of sight
- Around 35 m is often near the edge; community reports at that distance sometimes show weak uplink quality
- Around 60 m (200 ft) is frequently called a stretch for a stable mesh link
- Past about 100 m, the usual advice is a dedicated point-to-point radio (airMAX / NanoBeam class), not UniFi mesh
Because the backhaul is 5 GHz, the mesh link usually reaches less far than the longest 2.4 GHz client coverage people hope for from the same AP. Site-survey the parent signal at the pole before you commit the solar mount.
Placement rules that matter:
- Mesh links use the 5 GHz band, so you need line of sight or close to it. Every wall, tree, and hill costs you.
- Keep hops to a minimum. Every wireless hop cuts throughput and adds latency, and a wired uplink is always better when you can get one. Plan for one hop when you can; Ubiquiti recommends no more than two.
- Older AC Mesh documentation says a single wired uplink AP supports up to four wireless downlinks on one band. Treat that as a ceiling, not a target.
- A congested RF environment hurts mesh links. Consider DFS channels if they are less crowded where you are.
- Enable spanning tree (RSTP) when meshing is on, to prevent loops.
- Confirm the uplink RSSI in the UniFi controller after install. If you are well below −60 dBm, move the APs closer or switch to a PtP backhaul.
Power-saving tips
Because you are living on a watt budget:
- Turn off the radios you do not need. If the site only needs 5 GHz clients, disable 2.4 GHz.
- Reduce transmit power if coverage is more than you need.
- Turn the status LED off.
- Remove unneeded SSIDs. Each one adds beacon overhead.
- Do not use the AP's spare port to power other things unless you budgeted for them.
Other ideas worth considering
- Add a backhaul instead of a mesh link. If the solar site is much past about 30 to 60 m from the wired AP, or you need a stable high-throughput link, a dedicated point-to-point radio usually beats a UniFi mesh hop. It adds its own power draw — one university field-trailer power budget lists roughly 7 W for a backhaul radio and 9 W for the AP — but it is the right tool once mesh distance becomes the limit.
- Pair it with cellular or satellite. Off-grid community networks often run a solar node with Starlink or LTE as the backhaul. Some Starlink models accept 48 V passive PoE, which can influence your converter choice.
- Remote monitoring. Add a battery monitor or a shunt so you can see state of charge, and watch the AP's uptime in the UniFi controller. Brownouts show up as repeated reboots.
- Protect the electronics. Fuse both the battery and panel sides, ground the pole, and use surge protection on the Ethernet run.
- Plan for maintenance. Snow on the panel, bird nests, and corroded terminals are the usual failures. Mount the panel where you can reach it.
- Know the limits. Purpose-built solar Wi-Fi products have come and gone. The common advice in community discussions is still to build your own from an outdoor AP, charge controller, battery, and panel. Commercial solar Wi-Fi nodes exist, but expect to pay a premium for the integration.
Safety and legal notes
- Work on the DC side with proper fusing. A LiFePO4 battery can deliver very high short-circuit current.
- Keep high-voltage PoE wiring away from the 12 V battery wiring.
- Use enclosures and glands rated for your environment, and follow local electrical codes.
- Check that your AP's channels and transmit power comply with the rules in your country.
Checklist
- Pick the AP and confirm its power spec
- If using UAP-AC-M, plan antenna UV protection or RP-SMA replacements (or UMA-D if directional fits)
- Measure or estimate real power draw
- Size the panel for winter, not summer
- Size the battery for 2 to 3 days of autonomy
- Choose a DC-to-PoE converter matched to the AP (24 V passive vs 802.3af) with enough wattage headroom
- Fuse the battery feed and bench-test the converter + AP under load
- Bench test the whole chain before climbing a pole
- Adopt and update the AP wired first
- Enable wireless meshing and set Mesh Parent / Mesh Connect
- Confirm mesh parent signal at the install location (about −60 dBm or better)
- Confirm client coverage from the install location
- Add fusing, grounding, and surge protection
Wrapping up
A solar UniFi AP is not hard, but it rewards careful sizing and a bench test. Get the converter right, size for the darkest month, and keep the wireless link short and clear. If you build one, I'd like to hear how it goes — get in touch with Tierney Dynamics.
Sources
- r/Ubiquiti thread that inspired this post
- Ubiquiti Help Center: Considerations for Optimal Wireless Mesh Networks
- Ubiquiti Community: UAP-AC-M mesh uplink at ~35 m
- Ubiquiti Community: real-world Mesh Pro client distances
- UniFi AC Mesh datasheet (power, PoE modes, wireless uplink)
- Ubiquiti Community: UAP-AC-M antenna deterioration
- Ubiquiti Community: UAP-AC-M antenna replacement recommendations
- r/Ubiquiti: brittle AC Mesh antenna replacements
- UniFi UMA-D directional antenna datasheet
- U6 Mesh specs listing
- UniHosted: how UniFi mesh works
- NYC Mesh wiki: UniFi AP notes
- Ubiquiti Community: 12 V solar to mesh AP (Tycon TP-DCDC-1248GD)
- Tycon TP-DCDC Gigabit PoE converter datasheet
- Amazon: Tycon TP-DCDC-1224G (~$82)
- Amazon: Tycon TP-DCDC-1248GD (~$87)
- Amazon: Tycon TP-DCDC-1248GD-M (~$140)
- Amazon: PoE Texas GAT-50V30W (~$25)
- Amazon: PoE Texas GPOE-48V10W (~$16; 10 W — undersized for U6 Mesh peak)
- Amazon: Tycon RemotePro RPS1224G-100-100 (~$1,870)
- Amazon: Tycon RemotePro RPPL2424 (~$815)
- Amazon: TRENDnet TI-PG62B industrial PoE switch (~$175 renewed)
- Tycon TP-DCDC-1248GD product page
- Tycon TP-DCDC-1224G (24 V passive) product page
- PoE World GPOE-48V10W datasheet
- PoE World GAT-50V30W datasheet
- IO-Power outdoor 12 V to 48 V PoE converter
- Ubiquiti Instant Outdoor PoE Converter (48 V → 24 V — wrong direction for this build)
- Peak sun hours and panel sizing formula overview
- Winter peak sun hours in off-grid sizing
- NMSU AGIT POP power budget (AP and backhaul draw example)
- Community Networks Group: solar node with Starlink and 48 V PoE
- Cisco Community: solar-powered outdoor APs thread
Comments